 |
| Didn't get the camera out in time to take a picture of the whole loaf. |
One of my favourite childhood memories was baking bread with my grandmother. And at Easter she made paska. Sometimes my grandfather, with his beefy hands, would knead the dough for her, but it was her magical touch that made her bread legendary.
In a particularly memorable bread-baking fest, she took the whole production to the unfinished basement at her Brentlawn house. As she grabbed handfuls of flour and flicked her wrists not unlike a priest with a censer, motes of flour dust danced in the dim light from the basement window. With a few deft movements the dough went from a lump to a rope to a braid before being placed with speed, yet care into the waiting, greased pans. To my younger self, it was both mystical and miraculous that the bread effortlessly ascended then overflowed their vessels.
As a teenager, hoping to preserve a piece of my history, I brought a camera to one of our bake sessions. I faithfully recorded her swift and sure motions. When the developed photos came back, they were all a blur because her hands moved so quickly. I had caught the essence but not the details. I look at these out-of-focus photographs of her masterful, capable fingers working the dough and I miss her. I am back in that long-ago basement, amidst the slightly sour smell of yeast, the flour kissing my skin and covering my hair. I remember grandma's arms wrapped around me, as soft and warm and comforting as the dough we had just kneaded. To this day when I bake bread, I feel grandma's presence.

One of the most special of breads is Ukrainian Easter paska. On Easter morning, the paska is placed in a basket lined with a rushnyk (ritual embroidered cloth) and a candle is set in the centre. Butter (studded with a cross of cloves or formed into the shape of a lamb), salt, onions, sausage, eggs, horseradish, and cottage cheese are arranged in the basket and taken to church to be blessed. Then it's back home for one of the best meals of the year!

If you want to make your own paska for Easter it's not that hard. The distinguishing characteristic is that they are round and braided. They can be as simple or complex as you like. If you are hesitant about making a yeast dough, use a sweet dough recipe with your bread machine. Put it on the dough cycle and then shape the dough when it's ready.
One year, I was in Germany for both Easters and was tickled to have the chance to use fresh yeast - something that I've never seen here in Canada.

I'll put the recipe for the paska up first and then take you through some pictures that will explain the braiding technique. If you run into trouble, call me. Or make an appointment for next year. I'm always happy to have company while I bake.
Paska
1/2 cup warm water
1 1/2 Tbsp yeast
1 tsp sugar
Combine ingredients and let sit in a warm place until yeast is dissolved and bubbled (10 minutes) (Paul's Auntie Fran taught me to zap this mixture in the microwave for 8 seconds to "get it started".)
4 eggs, beaten
1/2 cup white sugar
1/2 cup butter/margarine
1 1/2 tsp salt
2 cups lukewarm water/milk
10-11 cups flour
Combine eggs, sugar, butter, oil salt and water. Add in softened yeast
Mix in flour and knead. Start by adding in 5 cups of flour and make a batter. Then add a couple more cups at a time. When the dough has enough flour, the dough will come off your hands and not be sticky any more.
Grandma had a couple of ways to tell the dough had been kneaded enough: 1) "until you sweat" and 2) "until it feels like a baby's bum."
Cover your hands with olive oil or butter and coat the top of the dough with the fat. Cover with plastic wrap and a towel. Set in a warm place and let rise until double (about an hour).
Punch down, grease, cover, and let rise again.
Form loaves - if you want to get fancy, there are pictures and instructions below.
It will make 3 or 4 paska, depending on the size of your pans.
Bake at 350º for 45 minutes - 1 hour. It should be nicely browned and sound hollow when you knock on it.
Egg wash
15 minutes before the end of baking, brush a mixture of 1 beaten egg and 2 Tbsp water over the dough. This will give it a nice golden glow.
Tip: Toothpicks can be used to help secure designs in place until after baking. Just remember to remove them after baking.
*It's not that easy to take pictures while you are baking and braiding bread. That's why you may notice some continuity issues. These are a mix of photos from a couple of different breadmaking sessions.
 |
| Mix the yeast, water and sugar. |
 |
| After the 8 second zap and 10 minute nap. See how the yeast is bubbling? |
 |
| Mix wet ingredients, including the bubbled yeast |
 |
| Start by adding enough flour to get a batter-like consistency. |
 |
| Keep mixing in flour. |
 |
| Start kneading with your hands. |
 |
| At this point, you're ready to grease the top, cover it and let it rise. |
 |
| Very nice rise. |
 |
| Punch down the dough. Notice I'm using a sort of rolling motion with my fist. |
 |
| Towards the end, you can "fold" the dough up and tuck it in. Turn the bowl 1/4 turn and fold up another piece. Repeat a few times. The dough will really deflate, but that's ok. It'll rise again. |
 |
| Before I start making all the braids and embellishments, I like to eyeball how much dough I need for a loaf. Here, I've got two pans and I figure out an amount each pan will hold. I then make all the braided bits from this amount of dough. |
 |
| This pretty much shows how much dough I'll need for the braided bits. |
 |
Separate from the amount of dough you've eyeballed, make a thin disk or pancake. Take a round ball of dough, and with a rolling pin start to flatten it. Sprinkle flour on the counter (under) and on the top of the dough so the dough doesn't stick to the counter and the rolling pin doesn't stick to the dough. |
 |
| Place the disk in the centre of the pan. |
 |
| Get ready to make the outside braid. Take two pieces of dough and roll them into a rope. One technique is to use a "w"-like motion. Position your hands in the centre of the dough and press gently as your hands roll the dough. At the same time that you are rolling back and forth, also move your hands in a gradual lateral (side to side) direction to slightly stretch the dough evenly. Just try to make sure the rope of dough is of uniform thickness. It's really hard to explain. But if the dough starts to rip, you're using too much pressure. Just form it back into a ball and start again. |
 |
| Twine the two ropes to make one twist. |
 |
| To make sure the ropes are long enough, before I twist them together I measure them around the outside of the pan. |
 |
| Carefully lift the twist and place around the pancake base. Cut the extra ends off and pinch together to make continuous ring. |
 |
| For the next ring, use 3 pieces of dough. |
 |
| Line them up. . . If they are too sticky when you are rolling them, add flour - a tiny bit at a time - to the counter to take away some of the stickiness. If it's too dry, spinkle a tiny couple of drops of water on your hands and rub them together. This might be enough to make the dough more pliable. |
 |
| Start braiding. I start from the middle and braid to the right. Then I start at the middle and braid to the left. This gives a nice even braid. (Braiding left from the middle requires you to braid by going under, rather than over. It takes a bit of thinking. For me at least.) |
 |
| Well, mostly even. Now place it in the pan, cut the edges off and pinch together. |
 |
| I made a 3rd braid and put it in the centre. |
 |
| This might be easier: an outside braid and some little balls in the middle. There are no rules, really. And it takes a bit of practice. |
 |
| Some people like to add crosses. I've never been good at this, but for what it's worth here are some pictures. I'm sure you an do better. |
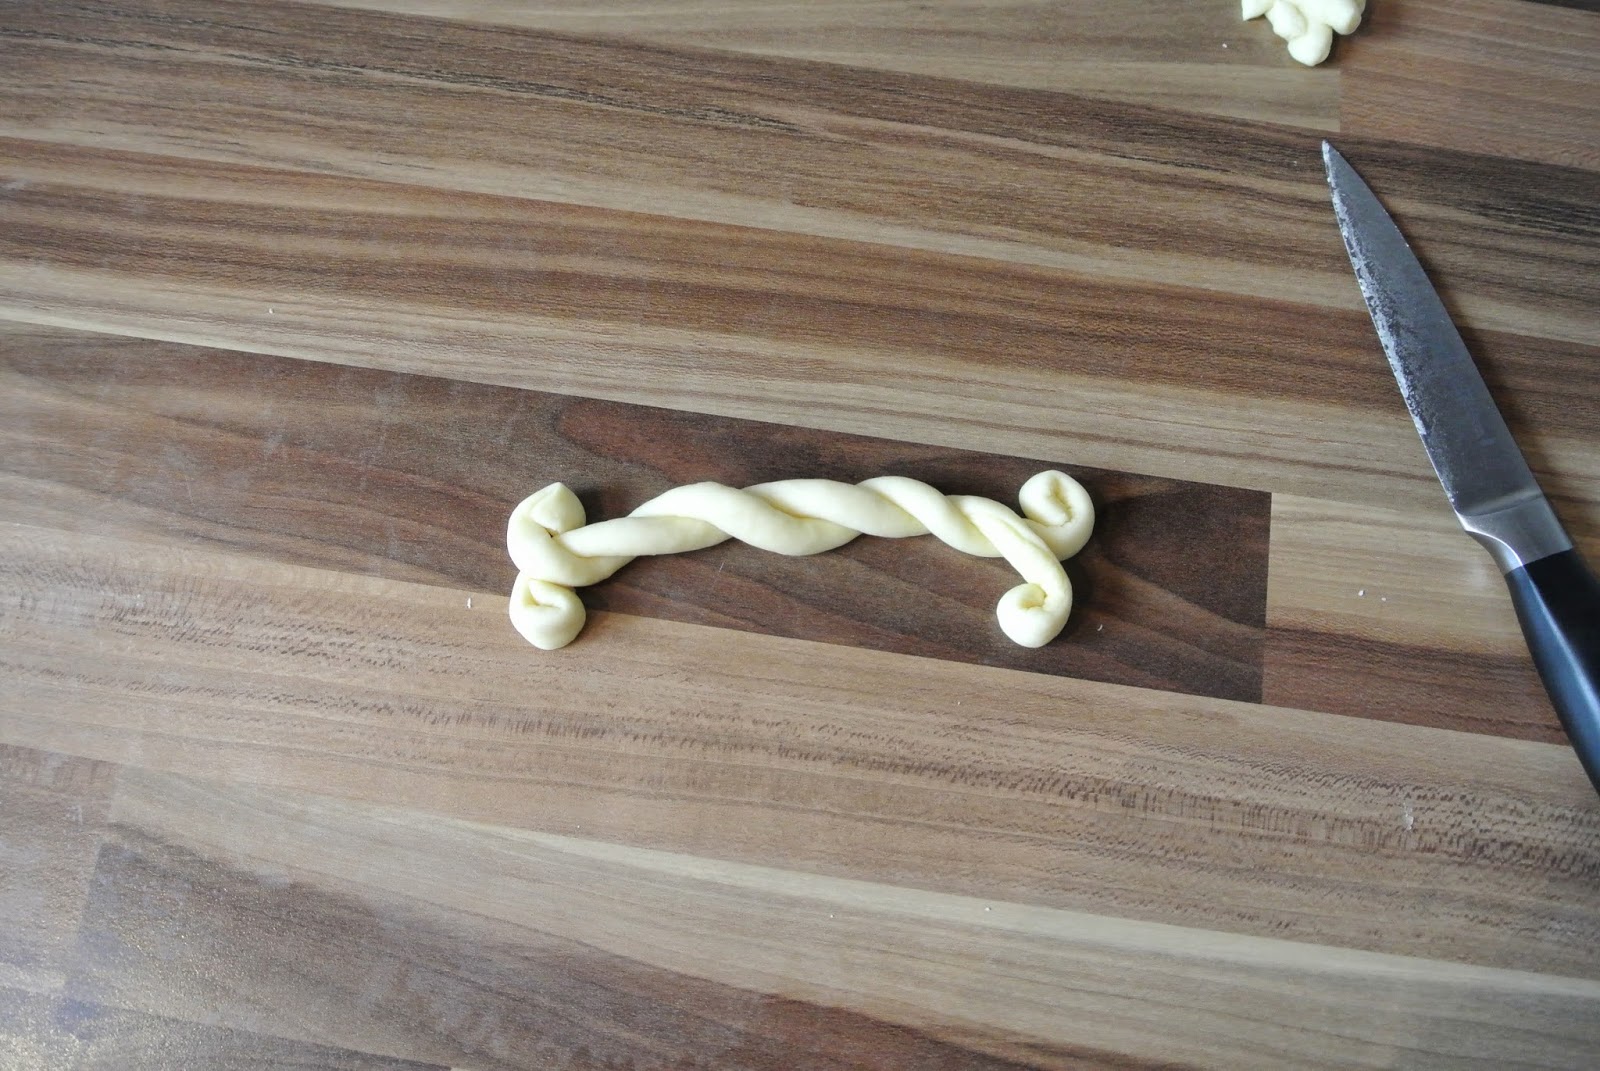 |
| The crosses traditionally have curled ends like this. |
 |
| Like I said, not my strong suit but you get the idea. |
And now - here are those blurry photos of my grandma's method. They were taken late 1970's so the colour is kind of hipster.
 |
| Here we go! Cutting the portions for braiding. |
 |
| Grandma is making two twists. Each one must twist in the same direction. |
 |
| Keep twisting - left over right. |
 |
| Now you take the two twists and twist them together in the opposite direction. For example if each twist was twisted left over right, then this step requires the twist to be right over left. |
 |
| So pretty and even. |
 |
| Grandma never used the disk of dough at the bottom. She just used the braids. I learned the disk method from the ladies at the Ukrainian Museum in New York. |
 | |
| I'd forgotten grandma made this shape until I found these pictures again. Two twists, one on top of the other. And she didn't even need to measure. She just knows it will fit in the pan. I'd say the bottom twist was just two strands. Easy! |
No comments:
Post a Comment